So if you read my Valentine’s Day post, you’ll know already that I recently attended an amazing conference centered on the topic of how to help adolescents thrive as they transition into adulthood. You’ll also know that the headliner of this conference was Jane Fonda. What you might not know is that this conference was one of the best professional/personal development experiences of my career as a school counselor. Not only for the sheer fact that I was in a room of committed individuals who were also passionately engaged in trying to be an ally for youth in an increasingly difficult world, but also because I left with actual, tangible resources that I can implement in my every day life.


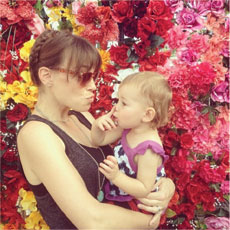
One of the best directly relates to the images you have previously seen on this blog and my various social media handles — that of images of my kiddos. When I first started out in the blogging game, I filled my posts with images of my family. I wanted a blog that was not only delicious to look at but that also gave readers a glimpse into my personal life. Here’s the thing though: My girls are growing up and, please Gd, they will continue to grow up. They’re going to grow up and become adolescents themselves and could quite possibly Google themselves, as Dr. Devorah Heitner so lovingly pointed out at this conference. I want to make sure that when that times comes, they don’t feel like their journey to adulthood was chronicled at every turn without their permission. In addition, and this is what really struck me, I don’t want my kids feeling like they always have to be ‘on’ because you never know when mom might be recording this for her blog/Instagram/Facebook. So, in an effort to give them more anonymity and to create a culture of consent in our family, I will now be ASKING their permission to take and subsequently publish their image (the baby is a bit too young for this so instead, I’ll just be more mindful of how much of her life I’m putting in front of strangers).


So what does this have to do with Purim and hamantaschen? Mostly nothing but I wanted to make mention of a change in what you’ll be seeing on this here blog for the future. Instead of the delicious faces of my kiddos, I’ll be sharing more delicious pictures of food. How ’bout them apples?!

And about these hamantaschen? Welcome to your new fancy ‘taschen. I have ALWAYS wanted to work with blood orange and black sesame. The flavors of each are delicious on their own but once combined with the yumminess of Joan Nathan’s hamantaschen dough recipe as featured in her book, Jewish Cooking in America, well, magic happens. And, I mean, come on, anytime I can make something naturally pink, I’m on it. While there are many steps to this hamantaschen recipe, most of them can be done days in advance. In fact, all of it can be done days in advance. Also, note that the black sesame does look and taste like poppy seeds so if you can’t find black sesame seeds (I found mine in Whole Foods), you could easily sub in poppy seeds.


Black Sesame Hamantaschen with Blood Orange Glaze

Dough Ingredients:

2/3 cup butter or margarine (room temperature)

1/2 cup sugar

1 large egg (+ 1 egg for glaze)

1 tablespoon blood orange zest

1/2 teaspoon vanilla extract

2 1/2 cups all-purpose flour

1 tsp baking powder

1/4 tsp of salt

Black Sesame Filling

1/2 cup roasted black sesame seeds

1/4 cup almond milk (or regular)

1/4 cup honey

1 tbsp zest of blood orange

1 tsp vanilla extract

1/2 tbsp butter

Blood Orange Glaze

1/4 cup freshly squeezed blood orange juice

1/2 teaspoon vanilla extract

1 cup powdered sugar

Dough Instructions:

Using a stand mixer or hand-held mixer, cream together the butter and sugar until light and fluffy. Add the egg, vanilla, and blood orange zest and continue creaming until smooth.

Stir together the flour, baking powder and salt to a separate medium-sized bowl. Slowly add the flour mixture to the butter mixture and mix until a ball of dough is formed (if not using a stand mixer, do this step not with the hand-held mixer but with a wood spoon). Shape dough into a disk, wrap in saran wrap and chill for AT LEAST 3 hours (I chill mine overnight).

Filling Instructions:

Lightly grind the black sesame seeds in a food processor using the “pulse” function for roughly 30 seconds.

In a small saucepan, combine the milk and honey over low heat, stirring until the honey dissolves into the milk. Then add the ground sesame seeds and bring to a simmer. Simmer for 7-10 minutes, stirring frequently. While it’s simmering, add the blood orange zest and vanilla.

Once the mixture has thickened considerably — or as desired, stir in the butter until it melts, cooking it for another minute or so. Remove from the heat and let cool to room temperature. You can make this a day ahead, when you first make the dough, and cover and store in the fridge.

Putting it all Together:

Once chilled, preheat oven to 375 degrees with rack in the center. On a floured work surface, roll out dough to a scant 1/4-inch thickness. With a 2 3/4-inch round cutter, or wide-rimmed drinking class, cut out circles; place on parchment-lined baking sheets. Gather scraps, chill while previous cookies are baking, and repeat with your roll-out and cutting until all dough is used.

Whisk together remaining egg and 1 teaspoon water in a bowl. Brush circle edges with egg wash; pinch seams together. Bake cookies on a parchment-lined baking sheet, 1 sheet at a time, about 10 – 12 minutes. Allow to cool completely before adding filling.

For Blood Orange Glaze:

Whisk together the ingredients until combined and smooth. Once cookies have cooled completely, drizzle on top until it’s perfectly covered in pink.

Hello and happy (almost) Purim! Can you believe that it’s almost Purim time? I seriously feel like it was JUST yesterday that I was making cheddar Sriracha latkes on The Feed Feed and now I’m making hamantaschen? How can this be? My waist line is not ready for all the holiday hamantaschen baking! Blargh!


I’m back from my little jaunt to exotic Dallas, Texas for the BBYO International Convention. I was there giving two separate presentations — one on food sustainability through the kosher lens plus a joint session with my girl, Amy from What Jew Wanna Eat. Amy and I had a session up against Aidy Bryant from Saturday Night Live and while our workshop was heavily attended, I’m not convinced that the majority of our audience weren’t students who weren’t able to get into the Aidy Bryant workshop. But that’s OK! They got to learn about food blogging so ha! Suckers! Ya learned something new!

I had SUCH an amazing time with Amy and meeting so many teens who frikkin’ love their Jewish selves. It was a bit of  a mind-trip to be at a BBYO conference as a 36 year-old mother of two. My days as a Jewish high school convention-attendee were so much fun but also so incredibly awkward (here’s to being a teen in the mid-90s). It felt crazy to be walking around this convention with the confidence that a grown woman should have while my 16 year-old self was screaming out, “Look at me now! I’m a grown a** woman. Now watch me lay in bed for an hour and read before turning out the lights for a sensible bed time of 9pm!”

But these hamantaschen! Oy! These hamantaschen. I did some research on Pinterest to get some inspiration for this year’s hamantaschen flavors. I have another flavor combo in my back pocket for the next week but for now, I’m really loving on the intensity of the chocolate in this dough and the realness of the fluffy middle. My official taste-tester for these was my husband as he ate enough Oreo/Hydroxy cookies as a child to consider himself an Oreo/Hydroxy expert and he swears it tastes like the real deal. Only, be warned, this chocolate dough is chewy and soft, the way I prefer my hamantaschen. You MUST be vigilant with your refrigeration/freezing of dough. Do not skip these parts of the process. They are vital. But, in case you do miss a bit and end up with wonky-shaped hamantschen, just delicately squeeze some filling over it and no one will ever know!

busy licking the spatula


a journey through Amy and Whitney learning how to pose for a picture.


(Heads up, this is NOT a hard cookie dough. I am not a fan of hard cookies so I made a soft, chewy cookie dough. See narrative and notes in the directions on maintaining the dough’s form while baking. Happy eating!)

Ingredients for Cookie

Ingredients for Cream Filling

Directions for Cookie

In the bowl of a stand mixer (or using handheld mixers), beat the butter and sugar together until smooth. Add egg, milk, espresso or coffee, and vanilla until mixed thoroughly.

In a separate bowl, sift together the flour, baking powder, cocoa powder, and salt. Slowly add dry mixture to wet mixture until incorporated. (Note: if the dough is too soft, increase flour amount by 1/4 cup of flour until firm – see notes written in narrative regarding the chilling and softness of the dough).

Shape dough into a disk, wrap in saran wrap and chill for AT LEAST (I chill mine overnight) an hour. Once chilled, preheat oven to 350 degrees with rack in the center. On a floured work surface, roll out dough to a scant 1/4-inch thickness. With a 2 3/4-inch round cutter, or wide-rimmed drinking class, cut out circles; place on parchment-lined baking sheets. Gather scraps, chill while previous cookies are baking, and repeat with your roll-out and cutting until all dough is used.

Whisk together remaining egg and 1 teaspoon water in a bowl. Brush circle edges with egg wash; pinch seams together. Freeze until firm, about 30 minutes. Bake cookies on a parchment-lined baking sheet, 1 sheet at a time, about 10 – 12 minutes. Allow to cool completely before adding filling.

Directions for Filling:

Using a mixer, cream the butter and shortening until fluffy. Beat in the confectioners’ sugar and vanilla. I used an icing bag with a small, round tip for filling centers of the cookie. You could just as easily ‘ice’ the centers with a knife or spoon but I do not think it will be as easy as using an icing bag and tip.

My first encounter with fondue was Senior prom, 1998. My date was my high school boyfriend; a nice Jewish boy named Josh. We went with our close friends to the local fancy fondue joint—The Melting Pot. My girlfriends and I all go our dresses at Cache, a dress store in the mall that I’m not sure still exists. My dress was dark blue, long and with an oh-so-elegant halter top neckline. Hashtag nothing but class. I honestly don’t remember what we ate that night because what sticks out in my memory is the moment my friend, Nicole’s dress caught on fire from under the table. If you’ve ever gone to The Melting Pot, you’ll know that the sternos are built into the table. Well, our table misfired and a spark flew out and caught onto the incredibly flammable netting of my friend’s dress. Needless to say, our meal was comped that night so, you know, totally worth it.


I got the idea for this post after reading Bon Appetit’s most recent holiday issue. They profiled Chef Ludo and his adore family, which I’m pretty sure lives somewhere around me in The Valley. Anyway, Chef Ludo made his family fondue for a traditional (but with a twist!) French family breakfast. I was looking at pictures of that delicious pot of melted cheese and I found myself thinking, “Damn it! I wanna dip some latkes into that delicious pot of melted cheese!!” Fondue for Chanukah, FTW!! I, of course, had to kosher-fy the fondue recipe since it was made with non-kosher cheese. And really, while the cheese is usually always the star of any recipe, I wanted to bring you 3 different kinds of latkes for you to choose from so even if you’re not into fondue, you’ve got some great latke recipes in your back pocket.


Latke Fondue with Traditional, Sweet Potato + Chive, & Apple/Pear Latkes

Fondue Recipe (based on Bon Appetit’s recipe):

  • 1 garlic clove, halved lengthwise
  • 1/4 cup Belgian beer
  • 3/4 cups dry white wine, divided
  • 1 1/2 tbsp cornstarch
  • 1/2 pound Gruyère, Edam or Swiss cheese coarsely grated
  • 1/2 pound Mini Ball cheese, grated
  • 1 tablespoons bourbon or brandy
  • 1/8 tsp baking soda
  • 1/2 tbsp fresh lemon juice
  • Kosher salt

Fondue Directions:

Rub inside of a large saucepan with cut sides of garlic. Finely grate garlic into saucepan; add beer and 1/2 cup of wine and bring to a boil over medium heat. Whisk cornstarch and remaining 1/4 cup wine in a small bowl until no lumps remain, then whisk into liquid in saucepan. Bring to a boil, whisking constantly, then reduce heat so mixture is at a very low simmer and very gradually add Gruyère, Swiss or Edam and Mini Ball Cheese, whisking until smooth (fully incorporate each batch of cheese before adding more).

Whisk bourbon and baking soda in a small bowl to combine, then whisk into fondue, followed by lemon juice; season with salt. Transfer to a fondue pot.

Ingredients and Directions for Traditional Latkes Here

Ingredients and Directions for Sweet Potato Latkes Here – do you and me a favor – omit the carrots and add  1 more sweet potato plus 3 finely diced chives to the recipe. Also, omit the cinnamon, sugar and cardamom and add 1/2 tbsp of garlic powder, 1 tsp of cayenne, 1/2 tbsp of kosher salt and 1 tsp of black pepper.

Ingredients for Apple and Bear Latkes (recipe based on Smitten Kitchen’s):

3 sweet, firm apples (I used Pink Ladies)
2 Bosc Pears
1 tablespoon lemon juice
6 tablespoons all-purpose flour
1 tablespoon granulated sugar
1/4 teaspoon cinnamon
1 teaspoon baking powder
2 large eggs
Vegetable or Canola Oil

Peel and core apples and pear then grate them, either on the large holes of a box grater or in a food processor, on the shredding blade. Transfer to a clean dishtowel and wring out as much juice as you can over the sink. Use a second towel if necessary as getting rid of as much moisture as possible will help the crisping up of your recipe.

Transfer grated apple and pear to a medium bowl and toss with lemon juice. In a small dish, whisk flour, sugar, cinnamon and baking powder and toss with the apples, coating them evenly. Whisk eggs in this small dish until lightly beaten and stir into apple-lemon-flour mixture.

Heat a large cast-iron skillet to medium with enough oil so that your pan is filled with about 1 – 2 inches of oil (healthy!). Once the oil is hot enough, drop tablespoons full of apple batter in little piles (4 at most at one time), gently pressing them a bit flatter with a spatula. Fry until they are nicely brown underneath, about 3 to 5 minutes, then flip and continue to cook until they are browned and crisp. Drain briefly on paper towels and transfer to preheated oven to keep warm.

image_pdfimage_print
%d bloggers like this: